ECM Outdoor Fan Motor Diagnostics
Electric Motor Testing and Troubleshooting: ECM Outdoor Fan Motor Diagnostics
Follow these steps and guidance for models 142 and 142R
IF THE MOTOR IS RUNNING:
- It is normal for the motor to rock back and forth on start up. Do not replace the motor if this is the only symptom identified.
- If the system is working properly but the motor appears to run slower than it should, the motor is good. High efficiency systems, especially those with optimized fan blades, will run the motor slower to decrease noise.
- If the system is noisy, freezing up, running a high head pressure, tripping the high pressure switch or the compressor overload, check the following:
- Clean the condensing coil and any shrouds thoroughly including in between two pass coils (this may require some unit disassembly) following the manufacturer’s recommendations. This motor will not compensate for lack of airflow through dirty coils.
- Confirm all fan blades are shaped the same, in good condition and not rubbing on the shroud. Also confirm the fan blade hub bolt is secure on the motor shaft. Also confirm the motor is secure in its mount and the mount legs are secure to the unit.
- Use the next section “If the motor is not running” for voltage checks to determine if the motor is getting the proper inputs.
- If the motor does not appear to be running at the proper speed or does not shut off, refer to the next section for voltage checks to determine if the motor is getting the proper inputs.
IF THE MOTOR IS NOT RUNNING:
This motor uses a 5 or 6 wire harness with wire colors specified by the OEM. Therefore the OEM schematic for the particular unit you are working on will be necessary to identify motor connections on the system controls.
- Check for proper high voltage and ground. Using the OEM schematics, locate the L1, L2, and Ground connections and confirm voltage is 208- 230 10%. Correct any voltage issues, worn or broken connections.
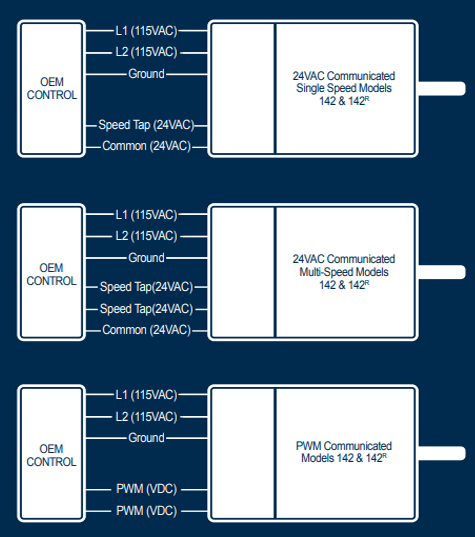
- This motor is energized and de-energized with communication inputs. Model variations include Single Speed 24VAC communication, Multi-speed 24VAC communication and Single or Multi-speed PWM communication. See example figures below. Using the OEM schematic, identify the communication type and check for proper voltage. PWM taps are diagnosed with DC voltage specified by the HVAC unit OEM.
- If the motor IS NOT receiving any communication, troubleshoot the communication issue using the manufacturer’s troubleshooting guides. The control board in the outdoor unit will need the proper demand call (low voltage or communication) from the indoor controls to provide the proper communication to the motor. Confirm these demand(s) are there before checking the communication to the motor.
- If the motor IS receiving proper communication (and proper high voltage power) and is not running, proceed to the next section on Motor Replacement.
Replacing the Motor
This motor is replaced in one piece. The control cannot be replaced separately from the motor. Even if the control is remotely located, the replacement part will be a new control with harness and new motor.
You must have the correct replacement motor from the manufacturer that is a direct replacement for the failed motor. USING THE WRONG MOTOR VOIDS ALL PRODUCT WARRANTIES AND MAY PRODUCE UNEXPECTED RESULTS.
Always mount the replacement motor and control (if mounted separately) according to the manufacturer’s specifications using all required hardware to reduce vibration. Make sure all wires are free of the fan blade and not pinched in mountings or cabinet through points.
Outdoor Motor Final Installation Checks
- Before energizing the HVAC system, confirm the fan blade is free of all obstructions, including the system shroud and compressor.
- Check all wiring and connections, especially those removed while servicing.
- Verify the system is running quietly and smoothing in all modes and stages if applicable.
- Check the refrigerant level only after confirming proper indoor airflow as well.
- Bent coil fins restrict airflow; correct if possible without damaging the coil or other fins.
- Return all thermostat settings to the customer’s preference.
Additional Good Practices:
- Finish all service calls by checking all safeties and perform a visual inspection of the overall job to prevent call-backs.
- Check the level of Carbon Monoxide (CO) in the vent(s) and living spaces of all homes with fossil-fuel appliances./li
- Recommend annual maintenance.
Talk to one of our expert sales professionals about how our solutions can efficiently power your business.